Cleaning Out Autodesk!
The other day I was talking to a client and we were in the process of cleaning out his files for Autodesk products, because he wanted to get a clean slate and remove all products from his system. Thinking that he knew what to do I mentioned to him that he needed to get the folders out of the program files from all locations. If you have surfed your system folders, you have seen the multitude of files/folders and their locations that Autodesk creates on your hard drive. Since he did not know how to go about doing this I then proceeded to help him through this tedious process.
I would like to explain how you need to go about cleaning
out these folders and locations so that you will be able to install new
software to a clean state. This helps
keep the programs tidy and clean which also helps clean up some much needed
hard drive space.
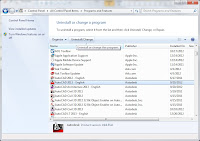
The first step in any uninstall is to go through your Windows’ Control Panel to “Programs and Features”, find your program and click on the “Uninstall/Change” button.
 \
\

 in the Autodesk program folder and the specific program you want to uninstall. In my opinion the easiest way to get to those files is through the
control panel, but you can do it either way.
Sometimes there are problems so always go back and make sure the
uninstall actually grabbed everything including the desktop icons.
in the Autodesk program folder and the specific program you want to uninstall. In my opinion the easiest way to get to those files is through the
control panel, but you can do it either way.
Sometimes there are problems so always go back and make sure the
uninstall actually grabbed everything including the desktop icons.Next we need to go into our computer, windows explorer, and find the locations that Autodesk has folders created in the program files of your system. For quick reference I will list them here. Warning: always make sure you have the rights and permissions to change your system, either through IT or your manager. If you are ever unsure always back up your system, just in case you mess something up.
Locations to delete:
C:\Program Files\Autodesk\
C:\Program Files\Common Files\Autodesk Shared\
C:\ProgramData\Autodesk\
C:\Program Files (x86)\Autodesk\
C:\Users\All Users\Autodesk\
C:\Users\**YOUR USERID**\AppData\Roaming\Autodesk\
C:\Users\**YOUR USERID**\AppData\Local\Autodesk\
Once you do all this you will need to clean out your
Recycling Bin as well.
You know as well I do that there are GB’s worth of data in these folders
and you need to clean your deleted files up.
Okay! So we have uninstalled the programs, cleaned out the
program files and cleaned up any remaining icons related to said products. Now we need to restart the computer to
refresh all the files and especially the registry. This is just good housekeeping manners. Once this is done then we can get to the nitty-gritty.\
Cleaning up the Registry.
Only proceed if you are comfortable in this management of
your system. If you have any questions
at all please consult your IT personnel or get professional help. Any slips in this modification can render
your system useless. The best thing to
do is to get someone who knows what they are doing to work on this
section. Also back up your system again
before continuing as well as your registry.
 Go to your start menu and type in the word “regedit” and hit
enter. This will pull up the Registry Editor. If you get a warning stating, "Do you want the following program to make changes to this computer?," say
yes.
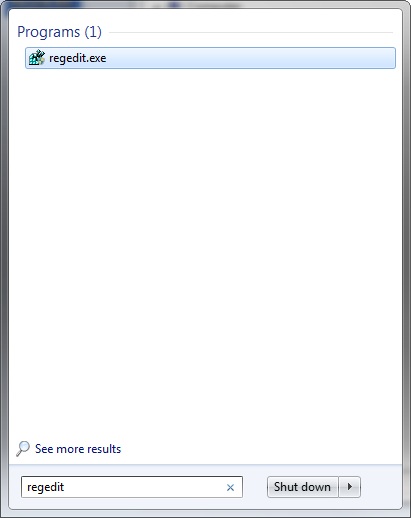
Go to your start menu and type in the word “regedit” and hit
enter. This will pull up the Registry Editor. If you get a warning stating, "Do you want the following program to make changes to this computer?," say
yes. You will now be brought to the editor
screen.
You will now be brought to the editor
screen.The following keys will need to be deleted if the uninstall process did not take them out.
(Settings per Windows 7 system)
\HKEY_CURRENT_USER\Software\Autodesk
\HKEY_CURRENT_USER\Software\Autodesk, Inc.
\HKEY_CURRENT_USER\Software\SOFTWARE\Autodesk
\HKEY_CURRENT_USER\Software\SOFTWARE\Autodesk
\HKEY_LOCAL_MACHINE\SOFTWARE\Autodesk
This should be all the keys that you will need to worry
about finding and deleting. Once you
complete this step restart your computer, go back into your registry and make
sure all Autodesk products have been removed.
Double check the “\HKEY_USERS” folder to make sure all Autodesk related
keys have been removed, again creating a backup of your registry before
continuing. Once this has been confirmed,
if there were any changes made restart your computer, and then you can proceed
to re-install the specific application needed.
This process is for a clean sweep of any and all Autodesk
products. If you desire to only uninstall
a certain product please do not follow these instructions to the “T” as it will
delete more than you want. You can
use these instructions to go and find the product you are uninstalling and pick
it out.
We at Sterling Systems can help you with your technical issues and your business needs. Just give us a call at (480) 719-4599 and we’ll be happy to assist you!
Steve Coburn,
Applications Engineer
Liability Disclaimer
Sterling Systems provides articles
and information for educational and entertainment purposes only.
You are strongly encouraged to
consult, a) Your PC's Manufacturing Company and b) Microsoft® before attempting to edit or alter
your system's configuration - including the Windows® Registry.
Furthermore, by viewing this site,
you agree that Sterling Systems cannot be held responsible - directly or
indirectly, in full or in part - for any damages or losses that may be suffered
as a result of taking action on the information published on SterlingSystems.com.
You
assume any and all risks associated with any actions taken as a result of
reading any and all articles.
