Friday, May 16, 2014

What's New at Autodesk for 2015 Products!

New Commands, Enhancements, etc. . . .

Well, it's that time of year again and we have the new 2015 Autodesk Products flying out the doors.

This months tech tip will include information on several programs and their new features and/or enhancements.

Let's start off with Autodesk AutoCAD 2015!

In lieu of writing every single line item down here in the blog I will give you a list of items and then point you to a document that will explain all of them in greater detail.

Items for the user:

  • "New Tab"
  • Help
  • Color Schemes
  • Workspaces
  • Ribbon Enhancements
  • Layouts
  • Improved Graphics
  • Model Space Viewports
  • Layer Sort
  • Isometric Drafting Environment

Items for the document:

  • Mtext Enhancements
  • Dimension Enhancements
  • Polyline Enhancements
  • Geographic Location

Items for Design:

  • Reality Capture
  • 3DOrbit

Items for Connecting:

  • Design Feed
  • Autodesk Translation Framework
  • DGN Data

Items for Customization:

  • Autodesk BIM 360 add-in for AutoCAD
  • Configuration
  • Button Images
  • Application Manager (Brand New) Click HERE for more detail

Click HERE for the complete details!


Next is Autodesk Revit 2015!

This list includes enhancements for Autodesk Revit 2015, Autodesk Revit Architecture 2015, Autodesk Revit Structure 2015 & Autodesk Revit MEP 2015.  As before I will only list the items that are new or enhanced and will provide a link to a complete detailed document.

Platform & Architectural Enhancements

  • Sketchy Lines
  • Anti-aliasing improvements
  • Ray Trace usability improvements
  • Enhanced schedules/material takeoffs
  • Views on Sheets
  • Duplicate views
  • View References
  • Assembly code settings
  • IFC imports
  • Keynoting settings
  • Shared parameters in view titles
  • Enhanced hidden lines
  • Revision improvements
  • IMages in schedules
  • Building element analysis
  • IFC linking
  • Manage links Dialog
  • Pinned element enhancements
  • Family parameter order adjustments
  • Tooltips for family parameters
  • Tag improvements

Structural Engineering Enhancements

  • Enhanced analytical model
  • Reinforcements for parts
  • Reinforcement numbering
  • Single fabric sheet placement
  • Presentation rebar sets
  • Enhanced multi-rebar annotation
  • Greater accuracy of as-built model definition
  • Structural section properties

Mechanical, Electrical & Plumbing Engineering Enhancements

  • Calculation methods for pressure drop
  • Tapped duct and pipe tags
  • Electrical API enhancements
  • Japan Autodesk Revit MEP software electrical content
  • US AWWA content, OOTB, (Out of the box)

Click HERE for the complete details!

Next is AutoCAD Civil 3D 2015!


User Experience

  • Updated UI
  • Enhanced feedback
  • Geographic Location
  • Point Cloud performance

Detailed Engineering

  • Profile layout enhancements
  • Corridor modeling enhancements
  • Subassembly Composer improvements

Production Drafting

  • Annotation enhancements
  • Sliced solids

Collaboration

  • Export to KML
  • Enhanced export for DWG™ & DGN
  • Civil 3D DWG consistency between 2013, 2014 & 2015

Click HERE for the complete details!

Last but not least Autodesk Navisworks 2015!


Quantification

  • Integrated 2D & 3D take off
    • Open 2D DWF™ files for quantification
    • Navigate between multiple 2D sheets & 3D models
    • Create a single project quantity workbook from multiple sheets & models
  • 2D Quantification
    • Polyline Markup tool
    • Rectangle Polyline Markup tool
    • Area Markup tool
    • Rectangular Area Markup tool
    • Quick Line Measurement tool
    • Bucket Fill tool
    • Quick Box tool
    • Custom Scale
  • Efficient 3D Takeoff
    • Takeoff Multiple objects from a single tree node
    • Add notes to objects in the quantification workbook
    • Property mapping dialog

Autodesk Rendering

  • Autodesk Consistent Material Support
    • Supports .RVT, .DWG, .IPT, .3DS & .FBX
  • Multi-Core Processing
    • Make use of all your processors
  • Drag & Drop Materials
    • Drag materials from the Autodesk Consistent Materials Library
  • Pre-set & User-defined Renders

Cloud Rendering

  • Utilize the Autodesk® 360 Rendering service

Autodesk Recap

  • Conversion Mode Options
    • Project Link / Scans / Voxels
  • Clash Subsets of scan data
    • Precisely identify clash location in scan
  • Set Interactive Point Size
    • Max Interactive point Size
  • Publish ReCap in NWD
    • Embed Xrefs option

Productivity Improvements

  • CPU Occlusion Culling
    • Disables obscured objects not seen by camera
  • Revit® Import Faceting Factor
    • Set the faceting factor
  • Arrow Markup Tool
    • Arrow Markup option lets you add arrows

Click HERE for the complete details!


This is only a limited amount of products that we talked about today and I am glad to share this and any of the other new features with you any time.  There is more out there and I urge you, if you have any questions, to please give us a call and we will be glad to help you in any way we can.

If you're in the process of purchasing new software, upgrading or trying to find out if any of the products we offer would be a good fit for you, our sales team is happy to assist.  If you need technical assistance our support staff is ready to help.


Sterling Systems can help you with your technical issues and your business needs. Just give us a call at (480) 719-4599.

Steve Coburn, Applications Engineer
Enhanced by Zemanta

Tuesday, March 18, 2014

"Vital to YOUR Assets" Tip of the Month!

Autodesk Subscription and Licensing!

In lieu of a technical tip this month, I thought I would write about the Autodesk’s announcement to discontinue upgrades for non-current licenses of Autodesk products.

You may have some questions about your assets.
  • Are your serial numbers correct?
  • Are your assets up-to-date?
  • Are any of your licenses eligible to be upgraded?
  • Are your network licenses being utilized correctly? 
  • Do you have the right number of licenses allotted for your staff? 
  • What are your current options and savings?
  • Will your Subscription assets be effected by the price increase?
  • How will your firm be effected after February of 2015?

I would like to extend our services to those of you who would like to become familiar with this data.  If in the past, you have had limited success in understanding your license assets, let us assist you.  Our staff is professional and has proven to be the best resource for those struggling in this time of “turmoil”.  Let us take the stress and worry out of the situation, by working directly with you as a liaison to Autodesk, and generate an accurate license file with all your assets listed and confirmed.

We can help with networking issues as well.  If you have never used network licenses or dealt with the Network License Manager (NLM), and think working with network licenses would help your processes, then we can help you with that decision. We can then construct, with you, a solid plan, that is the most cost effective for your budget according to your needs and potential growth.

We at Sterling Systems can help you with all your Autodesk issues and needs. Just give us a call at (480) 719-4599 and we'll be happy to assist you or click here to receive more information through your email.

Steve Coburn, Applications Engineer
Lisa Casey, Accounts Manager

Monday, February 24, 2014

February Tech Tip!

Importing Point Cloud into Autodesk® Revit® from Cyclone!

CloudWorx for Autodesk Revit

Step 1.  Install CloudWorx for Revit 1.1

Step 2.  Follow the normal process of installing the software to your hard drive.  Revit will need to be closed down during the install.

Step 3.  Once install is complete, open Revit.

Step 4.  You will need to start with an Architectural template or office standard template if available.

Step 5.  You now will have an additional tab at the top labeled CloudWorx.  Click on CloudWorx tab > Project panel > Import MS View > Import MX View.


Note:   The following steps are in reference to installing the Leica Geosystems Cyclone 8.1.1 software package prior to opening Revit.  Due to your licensing you may not have the ability to complete this function and future steps in this article.

Step 6.  When prompted to input CLM license server name click OK.  Sometimes “Localhost” must be submitted in place of leaving it blank.


Step 7.  The Import ModelSpace View dialog box will pop up allowing you to browse to the project you wish to import.  Select the [ . . . ] button allowing you to find the file.


Step 8.  Navigate to your “ModelSpace” view as before in the Cyclone program.


Step 9.  Open up the “ModelSpace View 1”.


Step 10.  You should now see that view in the dialog box under Connection String.

Step 11.  Click OK.
Note:  Depending on your CPU, ram and the file size the process of bringing in the points may take a couple of minutes.  Zoom All (ZA) to view the entire point cloud.

Step 12.  Depending on a few factors of your display driver, Revit’s graphic display settings and cyclones Open GL Mode setting the points may not look correct.  If something seems to be off or all the points are a single color, among other issues, we will need to go inspect the Open GL Mode setting.  If you are having a difficult time moving around the cloud, changing these settings will also help.

Modifying the Open GL Mode

Step 13.  Browse to the Start Menu > Leica Geosystems > Cyclone 8.1.1 > Utilities > OpenGL Modes.


Step 14.  In the Supported OpenGL Modes dialog box you will see the following screen.


Step 15.              You will need to look for any mode that has the following settings available.
RGB                32
ZBuf               32
DblBuf            Y
SW                  Y
HW                 n/a
OpenGL          Y

Step 16.  If you have more than one setting you can go between them to figure out which one will best suit your settings.  Mine is set to Mode 33.  To select the desired mode pick the number and then select Set Mode

Note:  In order to see the difference between the options you will need to close and restart Revit.


Step 17.  Before you close out Revit you will need to save the project in the CloudWorx Project pull down.


Step 18.  Once this is all done and the settings have been decided on you can then go to work on the project.

Step 19.  The first thing we need to do for setting up the project is to make sure that our levels are at the right elevations.  Open up an elevation view and review the locations of the cloud and the level marks for level 1 and level 2.  We can change either the level’s elevation or move the point cloud to suit our project template.  If we move the point cloud you will need to unpin it and make sure that you have your selection methods all checked.


Step 20.  Now that we have situated the cloud you will want to view it in the 3D view.  Migrate to the side of the building you wish to see and then we can start working the cloud to view a floor plan.


Step 21.  Click CloudWorx tab > Clipping panel > View X drop-down > Z Axis.

Step 22.  Single click at the #1 line, under the ceiling.  Then double click at the #2 line and this will create a section cut for the floor plan.

Product of “Z” slice.

Step 23.  Rotate your view as to see the top view and then rotate to have north at the top of the page.


Step 24.  You now use your wall tool within Revit to snap to the cloud and input the walls.  You may wish to rotate the building as to not have issues when drawing walls off axis.

Step 25.  If you decide to rotate the building you will be able to use Autodesk Revit’s rotate option to do so, but once you close out of the project the building will rotate back to its default setting.

Note:   In order to keep the rotation we must go into the Cyclone software and change the UCS settings for the project.  If this is not available then you will need to upgrade the software to include that option as this is not available within the “Viewer”.

Step 26.  Open Cyclone 8.1.1 to the project file that you have loaded in to the Autodesk Revit project.

Note:   I usually always open the unified file.

Default layout of project without any modification so far. Notice the location of the “Origin”.

Step 27.  Our next step will be to select three points in the cloud to use as reference points to change the UCS rotation.

Note:   Use your mouse buttons to orient the view to the corner you would like to use for your origin and rotation center.  Select “View Mode” and use your Left – Rotate, Right – Pan, Middle (held down while moving up and down) – zoom in and out.


 Pick Mode
 Multi-Pick Mode
 View Mode
 Seek

Step 28.  Using the above buttons try to zoom in to the corner so that you can differentiate the surfaces of the corner so that you can pin point a good origin for your first point. Using the “Multi-Pick Mode” select the first point as shown above.

Step 29.  As you go to pick multiple point switch between the Multi-Pick Mode and the View Mode to view the following points.

Note:   Remember to always go back after rotating and moving to the Multi-Pick Mode or else you will lose the previous points.  If you chose to use the Pick Mode, holding SHIFT+LEFT CLICK will select multiple points as well.

As you can see I have selected my first point.  I try to get a point that will be on the same surface as the Orange colored surface as I will use this as my North facing wall. 

Step 30.  Select points number 2 and number 3, consecutively as shown below.


In order to pick point #2 you may have to rotate the view around as such.


Step 31.  After you have selected the three points desired click View > Coordinate System > Set from Points.


Step 32.  In the Set Coordinate System from Pick points dialog box, review the options for changing the values of X, Y, Z and the angle for the Azimuth Point.  Since I want the point #3 to be in the West direction I need to change it from 0 degrees to 270 degrees.  This will orient the surface that point #1 and #3 create as my North face.  I recommend leaving the X, Y, and Z coordinates at the default settings until you feel more comfortable with making those modifications.


Step 33.  Rotate your view to the “Top View” to see the changes in effect.


Now that you have this modification made in the Cyclone project it will then transfer to the Revit project the next time you open it up. In order to keep the right orientation for your building these steps must be completed otherwise you will lose the layout and have to rotate your cloud every time.

We at Sterling Systems can help you with your technical issues and your business needs. Just give us a call at (480) 719-4599 and we'll be happy to assist you.

Steve Coburn, Applications Engineer


Enhanced by Zemanta

Thursday, January 16, 2014

January Tech Tip!

Modifying the Hatch Pattern for Revit Materials!

Well, I would like to take this time for this month’s tech tip to share with you a little something that, I’m sure most of you may know, but on the chance that you don't and those of you that are new to Revit, will benefit all of us.

I know some of you have thought about this and wanted to know how to change the hatch patterns in Revit to suit your office standards and have found it not easy to do. If you remember when you had to change them in AutoCAD, you had to find the pattern file and modify it so that it would pull into the system and therefore be available to you when you wanted to hatch something.

Well, Revit is not all that different and I will show you in the following process how to go about modifying or adding hatches to the Revit interface.

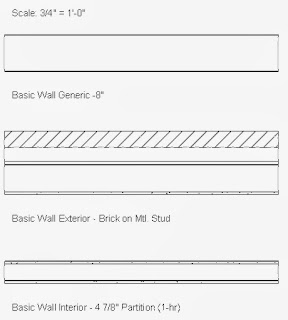
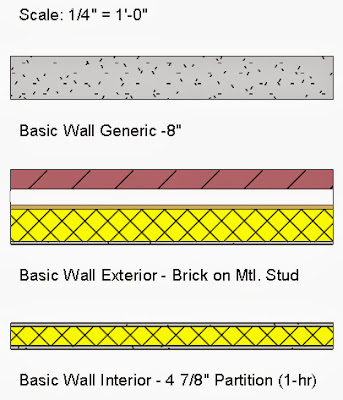
In the following example I will show you three walls that I will make changes to and give you the opportunity to see those changes.


As you can see already we have some hatch in there for the Gyp. Board but you can't really see it. Yes I know that scaling would work its magic and zooming in on the wall would help us see, but I just want to show you the process and not worry about the preciseness of the graphics; at least not until you need it to be.

I want to show you first that making a change to the hatch pattern is real easy and once you get the motions down you will feel very comfortable in messing around with your own creations of hatch. Maybe you already have hatches you created, well; this will be the way to add them.

Let’s first start off with changing the Basic Wall Generic - 8” wall to see the hatching we want to work with. I decided to work with the sand hatch since most of the time we want to see it on concrete surfaces, Gyp. Board walls and under a slab for the impacted fill.

So . . . select the 8” wall, open up the type properties and edit the structure.


Next you will want to pick on the materials button to choose a material.


Now you will want search for the Gypsum Wall Board to make the change to the cut pattern. All it takes is typing in the letters “GYP” and it will find the material. Once found, select it and you will see that the “Graphics” tab will activate and bring up the patterns for the Shading, Surface Pattern and Cut Pattern of the material. You will want to choose the “Cut Pattern” since we are seeing the wall in the plan view cut at 4’-0” above the finished floor. Select the area where the Pattern states “<none>”. This will bring you to the fill patterns dialog box.


As you can see there are two hatches labeled as Sand: “Sand” and “Sand - Dense”.


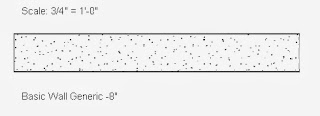
Select the “Sand” pattern and click on OK until you get back to your modeling space. You will see the hatch pattern come in the cavity of the Generic 8” Wall.


Now I want to show you another way to get to the materials and their cut patterns to modify the hatch.

Go to the “Manage” tab, under the “Settings” panel, and then click on “Materials”.


This process automatically brings you to the Material Browser in which we selected the Gypsum Wall Board last time going through the wall’s type properties. This process will allow you to globally change a material without having to find the specific model element and open up its type properties. This time you will notice that the material “Gypsum Wall Board” already has a pattern associated with it from the previous practice.

I want to try a different hatch to see if it makes it better so let’s choose the pattern they already have installed, “Sand Dense”.


Hit “OK” until you get back to your work space. We will notice that given the difference in the scale and the pattern the two walls shown below look similar but really the scale makes the difference and I may still want the hatch to be denser.


Here I have modified the walls shaded colors to show them in a different light. Notice that you really can't see the hatch for the gyp board in the other two walls. This is with the “Sand” pattern file.


Here is a closer look at the Basic 4 7/8” wall.


Now if we were zoomed up on this wall as tight as I am now we would have no problem, but I know some of us out there want it to show up better without having to zoom in.

Okay, now that I have shown you the main process of changing the hatch for a material lets back up to right before we change the pattern and lay out the process of creating/adding/modifying a hatch pattern.


To start off we need to find the main pattern file that Revit uses. To do this I simply did a search for the file “revit.pat” and it found several files since I have more than one version installed. To make it easy I will provide the path for the Windows 7 64bit OS with Revit 2014 installed:


If we open the file up with our Notepad you will see a bunch of number separated by commas. As you may have guessed these are our hatches. You will want to scroll through the file to find the sand hatches or do a simple CTRL+F to search for sand and it will take you straight to it.


For this demonstration all I want to do is to copy the sand hatch pattern and make a new .pat file so that I can import it into the new hatch and change the scale. So copy this text making sure you select everything from the asterisk symbol before “sand - dense, . . . “ to the one before “Sand, . . .” as shown below.


Paste this text into a new .txt file and save the file with the .pat extension. Remember to make sure you can see the file extension in your windows browser or it will keep it a txt file and it will not work with the Revit patterns. If you have to change it after the fact make sure you say yes to the warning message of changing the file type that windows pops up on your monitor.


I called my file sand2.pat


Now let’s get to the task at hand and finish this process.

Go back to your Revit session and go to the “Material Browser”. However you get there is ok as either way will do what we need it to do.

We want to first make a new material for the gypsum wall board so we don't change everything that is linked to the default “Gypsum Wall Board” material. Simply “Right-Click” on the material and select “Duplicate” and rename it per your liking. I chose to keep the main part of the name and only add “Dense Hatch” to it. You could make this any material in the book.


Make sure you have the new material selected before continuing as it is this material’s cut pattern we want to change.

As you go to change the pattern you will notice in the top right of the dialog box three buttons, one of which is labeled “New”. Select that button and follow the steps below.

  1. Pick the radial button for “Custom”.
  2. Select the “Import” button.


  3. Browse to where you saved the new pattern file we created a few minutes ago. Hit “Open” when located.


  4. Now choose some scales for the “Import Scale” to make it either less or more dense than the default patterns. I worked with several different scales before I picked the scale of (.1). I wanted to make sure I could see a difference especially for this article.


  5. Finally you will need to give it a name that is different than all the ones currently loaded.  I want mine to be "Sand Dense 2".


Once we have completed this step we can hit OK until we get back to our workspace, as long as we selected the new material, if not then we have to make sure that is selected and modified before continuing.

I’m going to let you make a copy of the one of the walls and change its material in the structure of the wall so that the new material will be allocated to the gyp board or in the example of the 8” wall the entire wall. The example below shows the 4 7/8” partition wall with the two different patterns, both at the 3/4” = 1’-0” scale.


And here is the 8" wall with the new material.


Well, this does it for the tech tip this month. I know that this scale of the sand pattern may not be feasible in most applications. I wanted to show the difference between changing the scale factor on the hatches you create versus the ones loaded by default. I did not have to create any new patterns, with inputting new numbers in the pat file, nor did I have to download any from the Internet. All I did was take what I already had and make a new file, load it and change the scale and there you have it.

We at Sterling Systems can help you with your technical issues and your business needs. Just give us a call at (480) 719-4599 and we'll be happy to assist you.

Steve Coburn, Applications Engineer


Enhanced by Zemanta