Punch it with Bluebeam Revu!
So . . . . I wanted to give a follow up article on a subject
that I recently reviewed not too long ago in one of my webinars. In getting to this subject in the video it
leaves some information lacking and I wanted to give more detail as to how and
why we needed this capability. I’m referring
to the Punch command inside the Bluebeam Revu CAD 10 program. If you missed the webinar you may see the
video here. I want to bring to your attention to the
process and reasoning behind it in a written format rather than in a video. So let’s get started.
With a session of Bluebeam Revu Cad opened let’s open up a
project that we have transferred over.
For ease I used the one I created for the webinar. Browse to a floor level that you want to set
up the punch sheets for.
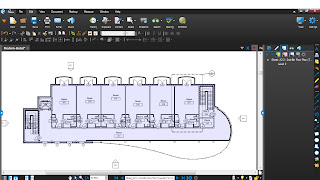 Now over in the right side, where you would find the
settings, measure and search functions and most likely the Sessions/Project
function you will see an icon for “Spaces”.
Let’s pick on that icon and start adding spaces. You first will want to plan out where you
want to add these elements and how you would like to manage them. I started out with one space and called it
Level 2, use it as a zone. To do this,
simply pick and pan around the floor plan until you encompass the entire
area. When you’re ready to close the
loop hit enter.
Now over in the right side, where you would find the
settings, measure and search functions and most likely the Sessions/Project
function you will see an icon for “Spaces”.
Let’s pick on that icon and start adding spaces. You first will want to plan out where you
want to add these elements and how you would like to manage them. I started out with one space and called it
Level 2, use it as a zone. To do this,
simply pick and pan around the floor plan until you encompass the entire
area. When you’re ready to close the
loop hit enter.
Now I continue to work
this way starting out with room 202. All
you need to do here is make sure you are within the outer boundaries of the
Level 2 space, only selecting room 202’s boundary. You can do this by either picking locations
or click and drag a box around the room from top left corner to the bottom
right corner.
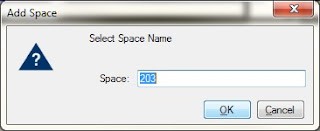 Proceed to the next room
and you will notice that Bluebeam automatically picks up the numbering system
and enters it in the space provided.
Continue to do this process until all rooms you wish to punch are
covered and showing up in the right side under the properties. I included all spaces for an example.
Proceed to the next room
and you will notice that Bluebeam automatically picks up the numbering system
and enters it in the space provided.
Continue to do this process until all rooms you wish to punch are
covered and showing up in the right side under the properties. I included all spaces for an example.
 Once you have all your spaces created you can then easily go
back and modify their colors and opacity to make them pop out and be seen more
easily. To do this you will need to
right click on the space name and select properties or select the gear icon
(properties) in the top right of the panel.
Once you have all your spaces created you can then easily go
back and modify their colors and opacity to make them pop out and be seen more
easily. To do this you will need to
right click on the space name and select properties or select the gear icon
(properties) in the top right of the panel.
Now we need to set up the pages or PDF in this case, for the
punch process. You can choose either to
have a separate PDF or append this punch PDF to the original PDF file for the
project. Remember this may not be a wise
decision as you may have RFI’s and other documents attached to it as well. Setting up a hyperlink is in my opinion the
best option for this type of document. I
will cover this process later.
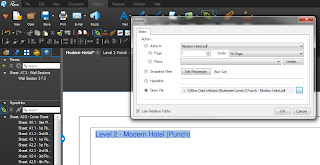
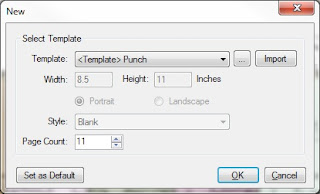 To set up the Punch PDF Revu has included several templates
for you to choose from and one of those is an 8.54x11 sheet built for that
purpose. Let’s pick that template and
tell it that we need 11 pages for this PDF because we know that there are 11
spaces on level 2’s floor plan, hit OK.
You now see a new PDF with the first page already displaying the
template that we chose. These can be
made to fit your office standards through template creation and form items
allowed within the program.
To set up the Punch PDF Revu has included several templates
for you to choose from and one of those is an 8.54x11 sheet built for that
purpose. Let’s pick that template and
tell it that we need 11 pages for this PDF because we know that there are 11
spaces on level 2’s floor plan, hit OK.
You now see a new PDF with the first page already displaying the
template that we chose. These can be
made to fit your office standards through template creation and form items
allowed within the program.
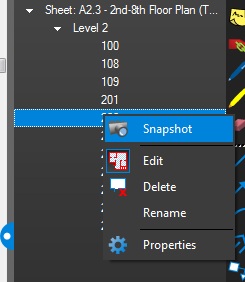 Now go back to the project PDF where we have our floor plan
in the display. Right click on the space
names on the right panel and select “Snapshot”.
This process does exactly what it means.
It takes a snap shot of only that space and allows you to paste it into
any other PDF.
Now go back to the project PDF where we have our floor plan
in the display. Right click on the space
names on the right panel and select “Snapshot”.
This process does exactly what it means.
It takes a snap shot of only that space and allows you to paste it into
any other PDF.
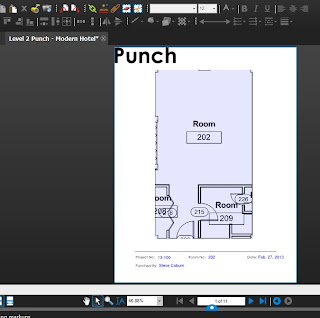 Switch to the Punch PDF; right click on the display space
and paste. Position your image on the
sheet at the top left and drag the bottom corner tick to scale up the
image. We’re not worried about scale
here because we only need this for punching purposes. However, if there was a dimension on this
image we could use that to calibrate the page’s scale factor and use it to
place dimension markups on it if needed.
Switch to the Punch PDF; right click on the display space
and paste. Position your image on the
sheet at the top left and drag the bottom corner tick to scale up the
image. We’re not worried about scale
here because we only need this for punching purposes. However, if there was a dimension on this
image we could use that to calibrate the page’s scale factor and use it to
place dimension markups on it if needed.
As you can see I have placed all spaces in the PDF by going
to each new sheet, switching to the project PDF and following the same process
as before. Do this each time for each
individual space. Yes a little monotonous,
but right now that is the process. Maybe
soon they will have the ability to populate the sheets by selecting all spaces
and adding them to sheets automatically.
OK, let’s talk about the hyperlink just for a second as we
need to set up on right away to help us in case of file collapse or computer
crashing. Save the file that you created
for your punch, preferably in the project file somewhere, but it is up to you. Return to the project PDF. In the sheet that we placed the spaces I want
to add a hyperlink so that I can get to the document quickly.
I created a text box and added a description
I wanted to see. I then “Flatten” this
sheet to allow the text to stay permanently and move around in case someone
wanted to change it.
 After this I then
either click on the “Hyperlink” icon in the top ribbon under the Markup menu or
I can hold “Shift+H” on the keyboard and then select the text by highlighting
it. Once this is done you receive a pop
up menu asking you to input the hyperlink’s location. Here is where you will tell Revu where to
find the new document we created. As I
may have mentioned in the webinar this can be any file you want to link to
including any cad file if needed. Under
the “Open file” option browse to the location you saved the file and select “OK”.
After this I then
either click on the “Hyperlink” icon in the top ribbon under the Markup menu or
I can hold “Shift+H” on the keyboard and then select the text by highlighting
it. Once this is done you receive a pop
up menu asking you to input the hyperlink’s location. Here is where you will tell Revu where to
find the new document we created. As I
may have mentioned in the webinar this can be any file you want to link to
including any cad file if needed. Under
the “Open file” option browse to the location you saved the file and select “OK”.
Let’s get to punching shall we.
In the bottom right section of Revu you will see an icon
that looks like a figure of a body, this is your profile icon and it displays
several option that allow you to either show or hide details/icons on your screen
relative to what your purpose at the time is.
Here we will choose the “Punch” profile.
This will change your display and then bring up the punching menus under
your “Tool Chest” that include an array of markups that involve different
disciplines of construction materials and basic notations for punching a
project. These are merely a start as you
can create your own as well.
For our example today I have placed some well-known punches
in room 202 and for the purpose of the article I copied and pasted them to
every other room with this type of layout.
Of course I had to move some around, but you get the point.
OK, we now have level 2 punched out. Oh by the way, did I mention that this could
be done onsite with an iPad that has connectivity to the server or even access
to the file that can then be uploaded later?
Of course the set up would have to take place first, then the team member
would go to the site and punch, take pictures, place them in the file as a
markup also. But now we’re back in the
office and managing the file.
Let’s take the file and view the markups over all. Under the bottom panel you will see a “Summary”
option that allows you to print this summary of redlines/markups to an Excel
spreadsheet, XML format and PDF format as well as regular printing to a
printer. Click on the “PDF Summary” and
we will add this on to the end of our punch pdf file for easy use and added functionality.


You now get a pop up window asking you to decide the range
of the summary, how to include the markups or columns, the options to append to
or create a new pdf document, title and how you want to view the text of the
markups themselves along with a preview of the markup and the sheet size
needed. Select “OK”. Revu runs and produces a document that now
contains all the markups in a summary that can now be used to email and
coordinate with those responsible for the punches reviewed in the field. If you appended the summary to the end of the
punch PDF you have the option now to click on the preview in the summary and go
straight to the markup on the punch document where it was originally placed. If you did not append that capability is not
there. In this case it would be wise to
set up own hyperlink to the summary file for future accessibility.

As you move along in the learning and use of Revu, you will
find many features that can help you and your company speed up some of the
processes that would normally take you weeks sometimes to accomplish. Imagine that this was set up within a day’s
time, punch was done normally and completed within a few days (depending on
size of project), brought back to the office and managed for another day, and
files sent out and collaborated within a couple more days’ time. This realistically could be done within a
week or two. You now have simplified the
communication process along with the documentation process and at the end of it
all you have a digital document that can be used to track comments, progress of
punch corrections and have a complete record of who did or said anything.
If you compare the amount of time and money spent on the
traditional path versus this new process and having better resources at your
disposal you will see where Bluebeam Revu has made a game change in realization
of documenting a project.
If you would like more
information on Bluebeam and their software offerings please contact us and we
will be glad to talk to you and consult on what will fit your business needs. Just
give us a call at (480) 719-4599 and we’ll be happy to assist you!
Steve Coburn, Applications
Engineer


